Friday, October 14, 2016

Install Node.js and NPM on Oracle Linux


Hi Folks

Stepping out from the Mobile Blog to do a short tech  blog.  We need node.js so in order to get it up and running while we blog the rest of the mobile set up on ICS we can be installing node.js in the background.

Node is not part of the standard YUM repos so we need another repo added ( there are lots of other ways  too ! ) .

Here's mine.

We need to get the EPEL Repo ( this has node in it ).
As root:

Need wget to get the first rpm
( we are using a very basic Oracle Install )
[root@mobdev1 ~]# cat /etc/redhat-release
Red Hat Enterprise Linux Server release 6.8 (Santiago)
[root@mobdev1 ~]#


[root@mobdev1 ~]# yum -y install wget
Loaded plugins: security, ulninfo
Setting up Install Process
Resolving Dependencies
--> Running transaction check
---> Package wget.x86_64 0:1.12-8.el6 will be installed
--> Finished Dependency Resolution

Dependencies Resolved

================================================================================
 Package       Arch            Version                Repository           Size
================================================================================
Installing:
 wget          x86_64          1.12-8.el6             ol6_latest          483 k

Transaction Summary
================================================================================
Install       1 Package(s)

Total download size: 483 k
Installed size: 1.8 M
Downloading Packages:
wget-1.12-8.el6.x86_64.rpm                               | 483 kB     00:00
Running rpm_check_debug
Running Transaction Test
Transaction Test Succeeded
Running Transaction
  Installing : wget-1.12-8.el6.x86_64                                       1/1
  Verifying  : wget-1.12-8.el6.x86_64                                       1/1

Installed:
  wget.x86_64 0:1.12-8.el6

Complete!
[root@mobdev1 ~]#


Now to get the EPEL RPM

[root@mobdev1 ~]# wget https://dl.fedoraproject.org/pub/epel/epel-release-latest-6.noarch.rpm
--2016-10-14 07:09:55--  https://dl.fedoraproject.org/pub/epel/epel-release-latest-6.noarch.rpm
Resolving dl.fedoraproject.org... 209.132.181.26, 209.132.181.24, 209.132.181.25, ...
Connecting to dl.fedoraproject.org|209.132.181.26|:443... connected.
HTTP request sent, awaiting response... 200 OK
Length: 14540 (14K) [application/x-rpm]
Saving to: âepel-release-latest-6.noarch.rpmâ

100%[======================================>] 14,540      --.-K/s   in 0.1s

2016-10-14 07:09:56 (103 KB/s) - âepel-release-latest-6.noarch.rpmâ

[root@mobdev1 ~]#

Now to install it. 
[root@mobdev1 ~]# yum -y install epel-release-latest-6.noarch.rpm
Loaded plugins: security, ulninfo
Setting up Install Process
Examining epel-release-latest-6.noarch.rpm: epel-release-6-8.noarch
Marking epel-release-latest-6.noarch.rpm to be installed
Resolving Dependencies
--> Running transaction check
---> Package epel-release.noarch 0:6-8 will be installed
--> Finished Dependency Resolution

Dependencies Resolved

================================================================================
 Package          Arch       Version    Repository                         Size
================================================================================
Installing:
 epel-release     noarch     6-8        /epel-release-latest-6.noarch      22 k

Transaction Summary
================================================================================
Install       1 Package(s)

Total size: 22 k
Installed size: 22 k
Downloading Packages:
Running rpm_check_debug
Running Transaction Test
Transaction Test Succeeded
Running Transaction
  Installing : epel-release-6-8.noarch                                      1/1
  Verifying  : epel-release-6-8.noarch                                      1/1

Installed:
  epel-release.noarch 0:6-8

Complete!
[root@mobdev1 ~]#

Now to get node.js and npm
yum -y install nodejs npm 

( Lots and lots of getting files remotely and  installing .. 

here's a sample

---------------------------------------------------------------------------------------------------------------------------------------------------------------------------------------------
Total                                                                                                                                                         12 MB/s |  57 MB     00:04
warning: rpmts_HdrFromFdno: Header V3 RSA/SHA256 Signature, key ID 0608b895: NOKEY
Retrieving key from file:///etc/pki/rpm-gpg/RPM-GPG-KEY-EPEL-6
Importing GPG key 0x0608B895:
 Userid : EPEL (6)
 Package: epel-release-6-8.noarch (@/epel-release-latest-6.noarch)
 From   : /etc/pki/rpm-gpg/RPM-GPG-KEY-EPEL-6
Running rpm_check_debug
Running Transaction Test
Transaction Test Succeeded
Running Transaction
  Installing : 1:libuv-0.10.34-1.el6.x86_64                                                                                                                                            1/110
  Updating   : openssl-1.0.1e-48.el6_8.3.x86_64                                                                                                                                        2/110
  Installing : nodejs-0.10.46-1.el6.x86_64                                                                                                                                             3/110
  Installing : nodejs-inherits-2.0.0-4.el6.noarch                                                                                                                                      4/110
  Installing : nodejs-semver-2.1.0-1.el6.noarch                                                                                                                                        5/110
  Installing : nodejs-mkdirp-0.3.5-3.el6.noarch                                                                                                                                        6/110
  Installing : nodejs-graceful-fs-2.0.0-2.el6.noarch                                                                                                                                   7/110
  Installing : nodejs-rimraf-2.2.2-1.el6.noarch                                                                                                                                        8/110
  Installing : nodejs-fstream-0.1.24-1.el6.noarch                             

after about 3 or 4 mins 

 redhat-rpm-config.noarch 0:9.0.3-51.0.1.el6                  v8.x86_64 1:3.14.5.10-25.el6                                v8-devel.x86_64 1:3.14.5.10-25.el6
  zlib-devel.x86_64 0:1.2.3-29.el6

Dependency Updated:
  openssl.x86_64 0:1.0.1e-48.el6_8.3

Complete!
[root@mobdev1 ~]#


[root@mobdev1 ~]# node -v
v0.10.46
[root@mobdev1 ~]#


Finally you should update node and NPM to the latest versions :

sudo npm cache clean -f
sudo npm install -g n
sudo n stable


npm install npm@latest -g


Wednesday, October 12, 2016

Setting Up Employee Self Service V2 Part 4 - Configuring EBS for ICS


Continuing our series on looking into the newest version of Oracle's EBS Mobile Applications,  we now move on to Part III - in which we amend EBS Vision Payroll Configuration so it makes for a reasonable demo.

Create a New EBS User

  1. Create a new schema user in EBS and call it XXMC.
  2. Grant the user the necessary privileges:
    GRANT CREATE SESSION TO XXMC;
    GRANT CREATE PROCEDURE TO XXMC;
    GRANT CREATE TYPE to XXMC;
    
QL> create user XXMC identified by r1234567;

User created.

SQL> GRANT CREATE SESSION TO XXMC;
GRANT CREATE PROCEDURE TO XXMC;
GRANT CREATE TYPE to XXMC;

Grant succeeded.

SQL>
Grant succeeded.

SQL>
Grant succeeded.

SQL>

This user will be a system user than can access and update employee timecard records in EBS. We'll later give this user the least privileged credentials that are needed for the solution to work (the ability to call the package XXMC_Utilities on Apps.

Create Custom Views and Packages

As the APPS user, run the provided SQL scripts in the following order to create the necessary views and packages:
  1. EBS/init/01_create_XXMC_HXC_WORKED_HOURS_V.sql
  2. EBS/init/02_create_XXMC_HXC_TC_WORKED_HOURS_V.sql
[oracle@bd8bc7 init]$ sqlplus apps @01_create_XXMC_HXC_WORKED_HOURS_V.sql

SQL*Plus: Release 12.1.0.2.0 Production on Wed Oct 12 11:34:19 2016

Copyright (c) 1982, 2014, Oracle.  All rights reserved.

Last Successful login time: Wed Oct 12 2016 11:30:52 -04:00

Connected to:
Oracle Database 12c Enterprise Edition Release 12.1.0.2.0 - 64bit Production
With the Partitioning, OLAP, Advanced Analytics and Real Application Testing options


View created.

Disconnected from Oracle Database 12c Enterprise Edition Release 12.1.0.2.0 - 64bit Production
With the Partitioning, OLAP, Advanced Analytics and Real Application Testing options
[oracle@bd8bc7 init]$ sqlplus apps @02_create_XXMC_HXC_TC_WORKED_HOURS_V.sql

SQL*Plus: Release 12.1.0.2.0 Production on Wed Oct 12 11:34:28 2016

Copyright (c) 1982, 2014, Oracle.  All rights reserved.

Last Successful login time: Wed Oct 12 2016 11:34:20 -04:00

Connected to:
Oracle Database 12c Enterprise Edition Release 12.1.0.2.0 - 64bit Production
With the Partitioning, OLAP, Advanced Analytics and Real Application Testing options


View created.

Disconnected from Oracle Database 12c Enterprise Edition Release 12.1.0.2.0 - 64bit Production
With the Partitioning, OLAP, Advanced Analytics and Real Application Testing options
[oracle@bd8bc7 init]$

  1. EBS/plsql/XXMC_Utilities.pks
  2. EBS/plsql/XXMC_Utilities.pkb
[oracle@bd8bc7 plsql]$ sqlplus apps @XXMC_Utilities.pks

SQL*Plus: Release 12.1.0.2.0 Production on Wed Oct 12 11:35:09 2016

Copyright (c) 1982, 2014, Oracle.  All rights reserved.

Last Successful login time: Wed Oct 12 2016 11:34:28 -04:00

Connected to:
Oracle Database 12c Enterprise Edition Release 12.1.0.2.0 - 64bit Production
With the Partitioning, OLAP, Advanced Analytics and Real Application Testing options


Package created.

No errors.
Disconnected from Oracle Database 12c Enterprise Edition Release 12.1.0.2.0 - 64bit Production
With the Partitioning, OLAP, Advanced Analytics and Real Application Testing options
[oracle@bd8bc7 plsql]$ sqlplus apps @XXMC_Utilities.pkb

SQL*Plus: Release 12.1.0.2.0 Production on Wed Oct 12 11:35:15 2016

Copyright (c) 1982, 2014, Oracle.  All rights reserved.

Last Successful login time: Wed Oct 12 2016 11:35:10 -04:00

Connected to:
Oracle Database 12c Enterprise Edition Release 12.1.0.2.0 - 64bit Production
With the Partitioning, OLAP, Advanced Analytics and Real Application Testing options


Package body created.

No errors.
Disconnected from Oracle Database 12c Enterprise Edition Release 12.1.0.2.0 - 64bit Production
With the Partitioning, OLAP, Advanced Analytics and Real Application Testing options
[oracle@bd8bc7 plsql]$
[oracle@bd8bc7 plsql]$

Note: The XXMC_Utilities package is set up with definer's rights.

Grant the XXMC User Permission to Execute the Newly Created Package

  • As the APPS user, run the following command to grant the XXMC user permission to invoke the package you created on Apps:
    GRANT EXECUTE ON APPS.XXMC_Utilities TO XXMC;
SQL> GRANT EXECUTE ON APPS.XXMC_Utilities TO XXMC;

Grant succeeded.

SQL>


Make a note of these least privileged user credentials. These are the database credentials you will be using later on in ICS. These packages give the Integration Cloud Service a standard way to interact with the data in EBS.

Create the Wrapper Types and Package That Can Be Called from ICS

  • As the XXMC user, run the EBS/integration/XXMC_ICS_TIMECARD_create.sql script.
Errors for PACKAGE XXMC_ICS_TIMECARD:

LINE/COL ERROR
-------- -----------------------------------------------------------------
3/9      PL/SQL: Declaration ignored
4/25     PLS-00754: illegal reference to editioned object
         APPS.XXMC_UTILITIES

SQL> alter user XXMC enabled editions;
alter user XXMC enabled editions
                *
ERROR at line 1:
ORA-00922: missing or invalid option


SQL> alter user XXMC enable editions;

User altered.

SQL>  select editions_enabled from dba_users where username in ('APPS','XXMC');

E
-
Y
Y

SQL>
drop it and run again

[oracle@bd8bc7 integration]$ sqlplus xxmc/r1234567 @XXMC_ICS_TIMECARD_create.sql

SQL*Plus: Release 12.1.0.2.0 Production on Wed Oct 12 11:45:54 2016

Copyright (c) 1982, 2014, Oracle.  All rights reserved.

Last Successful login time: Wed Oct 12 2016 11:45:45 -04:00

Connected to:
Oracle Database 12c Enterprise Edition Release 12.1.0.2.0 - 64bit Production
With the Partitioning, OLAP, Advanced Analytics and Real Application Testing options


Type created.

No errors.

Type created.

No errors.

Type created.

No errors.

Type created.

No errors.

Type created.

No errors.

Type created.

No errors.

Type created.

No errors.

Type created.

No errors.

Type created.

No errors.

Type created.

No errors.

Package created.

No errors.

Package body created.

No errors.
Disconnected from Oracle Database 12c Enterprise Edition Release 12.1.0.2.0 - 64bit Production
With the Partitioning, OLAP, Advanced Analytics and Real Application Testing options
[oracle@bd8bc7 integration]$


Note the Database Host, Port, SID (or service name), and Restricted User Credentials

These will be needed for ICS setup.

10.196.134.222
bd8bc7.compute-a423042.oraclecloud.internal
EBSDB
XXMC/R11234567

OK next step is to configure ICS !


Setting Up Employee Self Service Mobile V2 - Part 3b EBS Screen Configurations.

Continuing our series we now move on to Part 3b, which is more E-Business Configuration

From the linked Tutorial Here Are the Steps :

  1. Enable the HR Absences Integration with OTL profile option.
    1. Navigate to System Administrator > Profile > System.
    2. Search for the profile HR: Absences Integration with OTL.
    3. Modify the site-level value to Yes.
    4. Save the change.
  1. Disable obsolete absence elements and absence types. The absence elements and absence types that are pre-seeded in OTM Vision Weekly payroll do not work well when Absences and OTL are integrated. So we need to disable these absence elements and absence types.
    1. Navigate to US OTL Application Developer, Vision Corporation > Alternate Names > Alternate Name Definition.
    2. Search for the Alternate Name Definition: Vision OTL Elements - Enabled.
    3. For Alternate Names: Paid Vacation and Sick Hours Taken, uncheck the Enabled checkbox.
    1. Save the changes.
    2. Navigate to US Super HRMS Manager, Vision Corporation > Total Compensation > Basic > Absence Types.
    3. Search for the following Absence Types - Sick Time and Vacation.
    4. End date both the absence types by entering the current date in the Effective Dates To field.
    5. Save the changes.

  2. Create absence elements
    1. Navigate to US Super HRMS Manager, Vision Corporation -> Total Compensation -> Basic -> Element Description.
    2. Create an element with the following information:
      • Name: Absence Sick Hours Taken
      • Reporting Name: Absence Sick Hours Taken
      • Primary Classification: Information
    3. Save the changes.
    1. Click Input Values.
    2. Add a row with the following values:
      • Name: Hours
      • Units: Hours in Decimal format (2 places)
    3. Save the changes and close the dialog.
    1. Click Further Information.
    2. In the dialog that opens up, for Category, enter Absence Hours and click OK.
    3. Click OK.

    4.   If are asked to choose between correcting existing information versus preserving history, choose to correct existing information.
    5. Save the changes.
    6. Add another absence element with the following information:
      • Name: Absence Paid Vacation
      • Reporting Name: Absence Paid Vacation
      • Primary Classification: Information
      • Input Values::
        • Name: Hours
        • Units: Hours in Decimal format (2 places)
      • Further Information:
        • Category: Absence Hours
    7. Save changes.
  3. Link absence element to payroll.
    1. Navigate to US Super HRMS Manager, Vision Corporation > Total Compensation > Basic > Link.
    2. For Element Name select one of the absence elements added above (for example, Absence Sick Hours Taken).
    3. Check Link To All Payrolls.
    4. Save the changes.
    5. Repeat these sub-steps for all the absence elements added earlier.
  4. Create absence types.
    1. Navigate to US Super HRMS Manager, Vision Corporation > Total Compensation > Basic > Absence Types.
    2. Add an absence type with the following information:
      • Name: Absence Sick Time
      • Category: Sickness
      • Associated Element::
        • Name: Absence Sick Hours Taken Click OK for the question This element may be processed by the Payroll Run - continue?
        • Units: Hours
        • Balance: Decreasing
        • Reasons: Compassionate Leave, Dental Appointment, Doctors Appointment, Illness, Sick
    1. Save the changes.
    2. Add another absence type with the following information:
      • Name: Absence Vacation
      • Category: Vacation
      • Associated Element::
        • Name: Absence Paid Vacation Click OK for the question This element may be processed by the Payroll Run - continue?
        • Units: Hours
        • Balance: Decreasing
        • Reasons: Vacation
    3. Save the changes.
  5. Create element set.
    1. Navigate to US Super HRMS Manager, Vision Corporation > Payroll > Element Set.
    2. Add an element set with the following information:
      • Name: PackagedApps Absence Elements
      • Type: Run Set
    3. Save the changes.
    4. Click Include Elements.
    5. Add the two elements: Absence Sick Hours Taken and Absence Paid Vacation.
  6. Generate flexfield mapping.
    1. Navigate to US OTL Application Developer, Vision Corporation > Process and Reports > Submit Process and Reports ( bug in original text ) 
    2. For the question What type of request do you want to run?, select Single Request and click OK.
    3. Fill in the following values:
      • Name: Generate Flexfield and Mapping Information
      • Parameters::
        • Delete Definitions?: No
        • Element Set: PackagedApps Absence Elements
        • Effective Date: today's date in the format 30-Sept-2016
        • Include Absence Information?: Yes


    1. Click OK and then Submit. For the question Submit another request? choose No.
    2. Navigate to US OTL Application Developer, Vision Corporation > Process and Reports > View Requests.
    3. Select All My Requests and click Find. The Generate Flexfield Mapping request should be shown. The Phase should be Completed and the Status should be Normal.

  1. Configure absence types.
    1. Navigate to US OTL Application Developer, Vision Corporation > Absence Integration Setup > Configure Absence Types.
    2. In the Element Set text field enter PackagedApps Absence Elements and click Go. The Absence Types associated with the element set should be displayed.
    3. For all the absence types listed, change the value in the Timecard Action Allowed column to View and Edit.
    1. Click Save.
    Note: After submitting the Generate Flexfield Mapping request for an element set, there might be a short delay before the element set is searchable on the Absence Integration Setup page.

  1. Set alternate name definitions.
    1. Navigate to US OTL Application Developer, Vision Corporation > Alternate Names > Alternate Name Definition.
    2. Search for Alternate Name Definition: Vision OTL Elements - Enabled.
    3. Add an alternate name with the following information:
      • Alternate Name: Sick
      • From: leave the current date as is
      • Values: Absence Sick Hours Taken
      • Enabled: Checked
    4. Add an another alternate name with the following information:
      • Alternate Name: Vacation
      • From: leave the current date as is
      • Values: Absence Paid Vacation
      • Enabled: Checked
    5. Save the changes.
Finally we need to 

Customize the Review Layout

To show the Comment and Location fields on the Review page of the app, we need to upload a customized definition for the review layout:
  1. From the terminal of the EBS instance, with the correct TNS connection identifier, execute the following command to load the LDT file Payroll_review_comments3.ldt (located in the selfservice-backend/EBS/seeded directory of the solution) into the system:
    FNDLOAD apps/apps@ 0 Y UPLOAD $HXC_TOP/patch/115/import/hxclaytlayoutsld.lct Payroll_review_comments3.ldt
[oracle@bd8bc7 ~]$ FNDLOAD apps/apps@EBSDB 0 Y UPLOAD $HXC_TOP/patch/115/import/hxclaytlayoutsld.lct ./Payroll_review_comments3.ldt
Log filename : L7535553.log


Report filename : O7535553.out
[oracle@bd8bc7 ~]$


+---------------------------------------------------------------------------+
Concurrent request completed successfully
Current system time is 12-OCT-2016 11:17:34

+---------------------------------------------------------------------------+
                                                                                         

  1. Attach the new layout to the employee through OTL preferences:
    1. Navigate to US OTL Application Developer, Vision Corporation > Preferences > PackagedApps-Payroll > Timecard Layout > Preference Values.
    2. Modify Review Layout to Payroll Review Layout WC3 with Detail level comments and save.


That was a long and tedious process !  [[ PS where are the simple SQL for all this !!! ]]  Anyway its done now so let's move onto the next step, configuring EBS for ICS. 

Tuesday, October 11, 2016

Setting Up Employee Self Service Mobile V2 - Part 3a EBS Screen Configurations.

Continuing our series on looking into the newest version of Oracle's EBS Mobile Applications,  we now move on to Part III - in which we amend EBS Vision Payroll Configuration so it makes for a reasonable demo.

First thing to do is set the payroll for 30 years :

  1. Navigate to HRMS Management, Vision Corporation > HRMS Manager &g; Payroll > Description.
  2. Once in the Payroll dialog, press the F11 key, enter OTM Vision Weekly in the Name field, and press Ctrl+F11.
  3. Change the value of the Number of Years field to 30.
  4. Select File > Save.
  5. On the next box press Update.

File/Exit Oracle Applications.  

Now for the Preferences 

  1. Navigate to the US OTL Application Developer, Vision Corporation > Preferences page.
  2. From the main menu, double-click the Preferences function, type PackagedApps-Payroll as the name of the node, and save the change.
  3. Right-click the new PackagedApps-Payroll node, select New, enter Alternate Name as the name of the node, and save.
  4. Select the new node.
  5. In the Preferences field, enter Self-Service Timecard Alternate Name Set Defined for a User.
  6. In the Preference Values field, enter Vision OTL Elements - Enabled and click OK.

Note that steps 4,5,6 are all selecting from a list; there is no  direct entry . Once you have it all correct it should look like 


Now do file/save and repeat the entries 3-6 above for all ove the other entries required. 

This  will take about 15 mins per the instructions 


Now : 


  1.     On the Preferences form, click the Eligibility Criteria tab on the Preferences form and enter a blank query (Ctrl+F11).
  2.     Click in the first empty row and create a new record with the following values:
  3.         Name of rule: Payroll Rule
  4.         Name of Branch: PackagedApps-Payroll
  5.         Link By: Payroll
  6.         Linked to: OTN Vision Weekly
  7.         Precedence: Use any unique number that has not been entered on the form. You should enter a high number, such as 10000, because the precedence is calculated in descending order.
  8.     Save and close the form.
If tis done right it should look like 


Assign the Accrual Plan to the Test Users

  1. For every accrual plan there is a recurring element created with the same name as the accrual plan. This element needs to be attached to the assignment from the element entry screen.

  2.     Navigate to HRMS Management, Vision Corporation > HRMS Manager > People > Enter and Maintain.
  3.     Find the test user using the first and last names. (See the 01_seed_test_users.sql script for their full names)
  4.     Navigate to Assignment > Entries (or) Fastpath > Element Entries.
  5.     Add elements by clicking in the first empty row and creating a new record with the following values:
  6.         Element Name - Sick Time Accrual, Processing Type - Recurring
  7.         Element Name - Vacation Accrual, Processing Type - Recurring
  8.         Element Name - Family Medical Leave, Processing Type - Recurring
  9.     Select File > Save

Repeat until all test employees are done ( why they could not just do this with a bunch of PL/SQL APIs I do not know 

That is enough for one blog.  Tomorrow I will blog about fixing OTL .  A basic step and hopefully should go according to the manual.  

So far we have been OK, just minor fixings. 

Setting Up Employee Self Service V2 - Part 2 - The database data


Continuing our series on looking into the newest version of Oracle's EBS Mobile Applications,  we now move on to Part II - in which we upload the relevant database data.

We assume here you have an EBS instance you can use.  For our purposes we will use a Vision instance as it is well understood as the sample Oracle database for E-Business Suite.

Our steps are as follows

1. Load the database Data 

In order to do this : 
(copypasta from the tutorial information)
  1. Navigate to the selfservice-backend/EBS/seeded directory to access the necessary scripts.
  2. Open 01_seed_test_users.sql in a text editor and edit the username information in as needed.
  3. Run the following scripts as the APPs user:
    01_seed_test_users.sql
    02_create_person.sql
    03_create_user.sql
    04_add_resp.sql

OK so let's upload the files :
Done.

There doesn't look like there's any edits needed to the sample data


Insert into TEST_PERSONS (SL_NO,USERID, FIRST_NAME, LAST_NAME, EMAIL, SEX) values (1,'appsol1', 'Douglas', 'Smith', 'dsmith@oracle.com', 'M');
Insert into TEST_PERSONS (SL_NO,USERID, FIRST_NAME, LAST_NAME, EMAIL, SEX) values (2,'appsol2', 'Michael', 'Davis', 'mdavis@oracle.com', 'M');
Insert into TEST_PERSONS (SL_NO,USERID, FIRST_NAME, LAST_NAME, EMAIL, SEX) values (3,'appsol3', 'Patricia', 'Miller', 'pmiller@oracle.com', 'F');
Insert into TEST_PERSONS (SL_NO,USERID, FIRST_NAME, LAST_NAME, EMAIL, SEX) values (4,'appsol4', 'Linda', 'Williams', 'lwilliams@oracle.com', 'F');

so let's go with that.
Let's run these scripts as the APPS user ?


Sourcing the RUN File System ... [oracle@bd8bc7 ~]$


[oracle@bd8bc7 mobilesamp]$ sqlplus apps


SQL*Plus: Release 10.1.0.5.0 - Production on Tue Oct 11 13:06:41 2016

Copyright (c) 1982, 2005, Oracle.  All rights reserved.


Connected to:
Oracle Database 12c Enterprise Edition Release 12.1.0.2.0 - 64bit Production
With the Partitioning, OLAP, Advanced Analytics and Real Application Testing options

SQL> @01_seed_test_users.sql

Table created.


1 row created.


1 row created.


1 row created.


1 row created.


Commit complete.

SQL> @02_create_person.sql


PL/SQL procedure successfully completed.

No errors.


Part 3 fails wth 

SQL> @04_add_resp.sql
DECLARE
*
ERROR at line 1:
ORA-20001: APP-FND-02604: One or some of the following data is not valid:
APPLICATION_SHORT_NAME=PER, RESPONSIBILITY_KEY=EMPLOYEE_DIRECT_ACCESS_V4.0,
SECURITY_GROUP=202.
ORA-06512: at "APPS.APP_EXCEPTION", line 72
ORA-06512: at "APPS.FND_USER_PKG", line 3191
ORA-06512: at line 29

BUT 
select * from FND_SECURITY_GROUPS_VL
  2  ;


SQL> set linesize 32000
SQL> /

ROW_ID             SECURITY_GROUP_ID SECURITY_GROUP_KEY             CREATED_BY CREATION_DATE      LAST_UPDATED_BY LAST_UPDATE_DATE   LAST_UPDATE_LOGIN SECURITY_GROUP_NAME                                                            DESCRIPTION
------------------ ----------------- ------------------------------ ---------- ------------------ --------------- ------------------ ----------------- -------------------------------------------------------------------------------- ------------------------------------------------------------------------------------------------------------------------------------------------------------------------------------------------------------------------------------------------
AAAjqwAAeAAAATWAAA                 0 STANDARD                                1 09-OCT-98                      120 22-OCT-01                          0 Standard                                                                       Default Security Group
AAAjqwAAeAAAATWAAB                 1 GOVERNMENT                           1318 07-OCT-02                     1318 07-OCT-02                    1826651 Government                                                                     Government Security Group

SQL>

Let's try secgroup STANDARD instead ? Edit the scripts and now

[oracle@bd8bc7 mobilesamp]$ sqlplus apps/apps @03_create_user.sql

SQL*Plus: Release 10.1.0.5.0 - Production on Tue Oct 11 13:34:24 2016

Copyright (c) 1982, 2005, Oracle.  All rights reserved.
Connected to:
Oracle Database 12c Enterprise Edition Release 12.1.0.2.0 - 64bit Production
With the Partitioning, OLAP, Advanced Analytics and Real Application Testing options


PL/SQL procedure successful

[oracle@bd8bc7 mobilesamp]$ sqlplus apps/apps @04_add_resp.sql

SQL*Plus: Release 10.1.0.5.0 - Production on Tue Oct 11 13:34:55 2016

Copyright (c) 1982, 2005, Oracle.  All rights reserved.


Connected to:
Oracle Database 12c Enterprise Edition Release 12.1.0.2.0 - 64bit Production
With the Partitioning, OLAP, Advanced Analytics and Real Application Testing options


PL/SQL procedure successfully completed.

No errors.
Disconnected from Oracle Database 12c Enterprise Edition Release 12.1.0.2.0 - 64bit Production
With the Partitioning, OLAP, Advanced Analytics and Real Application Testing options
[oracle@bd8bc7 mobilesamp]$

OK now we have it loaded in the next blog we will put in the OTL changes needed to have a good experience in EBS 


Setting Up Employee Self Service V2 - Part 1


Following my last post, it's time to start setting up our system so that we can implement E-Business Mobile Solutions !

To get up and running we follow the tutorial at http://www.oracle.com/webfolder/technetwork/tutorials/cloud/MCS_Packaged_Apps/EBS%20Self-Service%20Apps/ebs-self-service/ebs-self-service-v2.html#section5s2

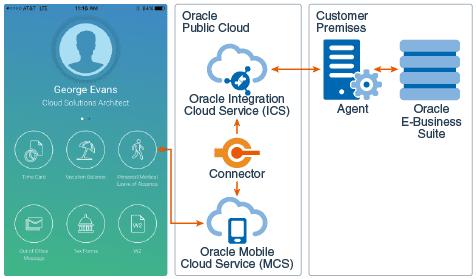
Here's a generic picture from the tutorial of what it all looks like; we need to take all the pieces below and configure them


There are several steps to do and we will blog as we go.   The mobile application will call Mobile Cloud Service , which will in turn call an Integration back to  E-Business Suite which will invoke the relevant functions in E-Business Suite.

We will start from the left hand side and this will encompass four tasks

  1. Configure the EBS Instance
  2. Configure EBS to work with  ICS
  3. Set up ICS
  4. Configure ICS Users and Roles 
  5. Download and Install the ICS On-Premises Agent. 
Once that is done we will blog some more about setting up ICS and MCS, and then finally we will look at the UI.

There is a big zip file to download that has the code and data for the tutorial, so download and unzip it to a folder.
On to the next post, what to do with the database data 
Thanks for Reading 
Chris 

Oracle's new E-Business Mobile Cloud - Employee Self Service V2


Oracle have just released the latest version of their mobile solutions for E-Business Suite.

This takes a far more integrated and extensible approach to customization , using Oracle's own Mobile Cloud Service, and Integration Cloud Service.

Over the next few blogs I hope to be working through Oracle's own example to show how compelling this proposition is, and to demonstrate its extensibility and suitability to use as a candidate for RMAD tooling,  so we can enable some Citizen Developers via Oracle MAX

This is very exciting .

See

https://blogs.oracle.com/mobile/entry/mobile_solutions_employee_self_service